
Vinyl siding may look tough as nails, but it’s still vulnerable to damage. Cracks and holes let in moisture that can lead to mold and mildew inside walls and raise heating and cooling bills.
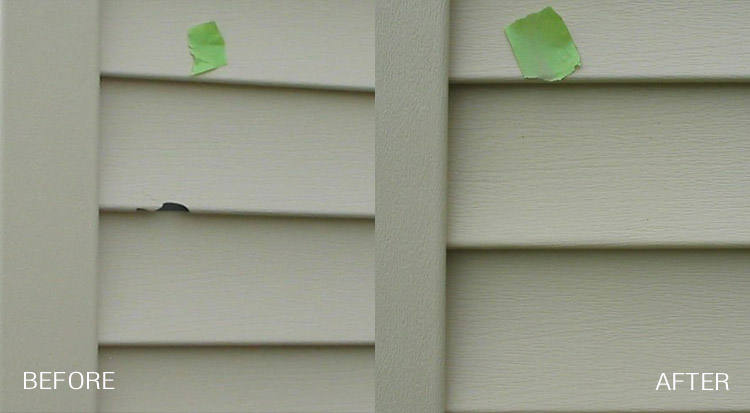
Small cracks and holes are easily covered with peel-and-stick adhesive patches, available at Vinyl Siding Repair Charleston SC. Touch it up with color-matched paint, and the repair is nearly invisible.
Holes and cracks are among the most obvious signs that your vinyl siding is in need of repair. Regardless of the cause—from harsh weather to holiday decorating mishaps—holes in your home’s exterior can let moisture and pests in, causing further damage to the structure. When the holes are small enough, caulking or patching them might be the best solution, but if the cracks are wider, replacement is usually a more practical option.
Before you can begin your repairs, it’s important to clean the affected area thoroughly. You should use warm soapy water and a microfiber cloth to remove any dirt, debris, or dust from the surface of the panel. Doing so will ensure that the caulk adheres properly, and it will also help the repaired section look like a complete piece of vinyl. You’ll want to protect your hands, fingers, and eyes as well, so be sure to wear gloves and safety glasses when using potentially dangerous tools like tin snips or utility knives.
Whether your vinyl siding is damaged from severe weather or simply from age and wear, a fresh coat of paint can make the difference between a visually appealing exterior and one that looks shabby. If you have a section of your vinyl that needs repainting, choose a color that matches the existing coating and prepare to get to work.
In addition to painting the vinyl, it’s a good idea to apply a primer that’s designed specifically for vinyl surfaces. This will provide a better base for your new coating and help it last longer, protecting the structural integrity of your home’s exterior.
If you’re attempting to repair a section of vinyl that was improperly hung, the panels may buckle or warp. If they do, it’s important to call a professional as soon as possible so they can assess the situation and decide if replacing that section is the best course of action.
If you’re repairing vinyl that was properly hung, you can try to fix the buckling or warping by using a power drill or hammer and pry bar to loosen the nail strip at the bottom of the panel. Once you’ve done this, cut a replacement patch out of a spare piece of vinyl, making sure it’s 2 inches wider on each side than the removed segment. Afterwards, carefully use your zip tool to hook the replacement piece of vinyl onto the lip of the surrounding panel and secure it in place.
Repairing broken panels
Sometimes a hole in vinyl siding is too big to be fixed with caulking or patching alone. In this case, you will need to replace the damaged panel. Fortunately, this is an easy task that can be completed in less than 30 minutes.
First, make sure that the hole is not caused by pests such as woodpeckers mining for food behind your home’s vinyl. If it is, you will need to eliminate the pests before proceeding with any repairs.
Once you have confirmed that the damage is caused by a broken panel, remove the panel using a zip tool (also called a siding removal tool). Hook the tool underneath the lip of the panel and pull downward to unhook the vinyl. Continue unhooking the vinyl on both sides of the panel until it is free.
Next, use 220-grit sandpaper to lightly de-gloss the area around the damaged panel. This will help the new filler adhere to the surface of your vinyl. Finally, cut a replacement piece of vinyl siding to the length needed for the repair. Ideally, the replacement panel should overlap with the panels above and below it by at least 2 inches to ensure that moisture does not sneak into the wall cavities.
Place the new panel into the void and press down on it to secure its lower lip. Then, align the top of the new panel with the bottom of the panel above and fasten it in place with nails or screws. Lastly, trim any excess from the edges of the new panel using a utility knife.
Using a caulk gun, apply vinyl caulk over the exterior perimeter of the damaged panel. Make sure that the caulk extends a little past the outer edge of the patch so that it is not visible when the patch is installed. Allow the caulk to dry for a few hours before applying any paint. Paint the repaired panel with a latex color that closely matches the rest of your vinyl siding. This will minimize the appearance of the patch and make it more resistant to moisture.
Repairing damaged shingles
A few dents and small holes in vinyl siding are common, but large ones can allow water to seep behind the panel. This can lead to further damage and even cause mold to grow inside the home. The best way to repair these larger holes is to use a high-quality patching material, which can be purchased in either self-adhesive or traditional form. Before you apply the filler, first lightly de-gloss the area around the hole using 220-grit sandpaper. This helps the filler adhere to the siding better. Once the patch is dry, use a plastic putty knife to smooth the surface. Then touch up the spot with exterior-grade paint that matches the surrounding vinyl.
If the damage is widespread, you may need to replace the whole segment of siding that’s damaged. This is often the case if the siding is nearing the end of its expected lifespan or has suffered significant impact from weather events like hail and wind.
To remove a damaged section of vinyl, first expose the nails that hold it to the sheathing with a pry bar or hammer. Next, use a zip tool—which is a siding removal tool that works like a hook—to pull up and unhook the panel from the panels above it. You’ll likely need to use a drill or screwdriver to remove any screws.
Once the broken segment of vinyl is free, carefully lift up the panel above it and remove any nails that hold it to the sheathing. Cut a new replacement piece of vinyl to the proper length with a miter saw or table saw. Set the new piece over the old one, then hook it together with the shingle laying on top. Secure it with the nails and screws from the panel above it.
For divots and small holes less than an inch wide, you can typically complete the repair in minutes. Load a caulking gun with waterproof caulk and apply a bead around the hole, smoothing it with a putty knife as needed. Allow the caulk to dry completely before applying a fresh coat of paint that matches your siding.
Repairing stained panels
While vinyl siding is generally hailed as maintenance-free, it can still sustain damage and require some repairs from time to time. Fortunately, vinyl siding can be easily repaired by following some simple steps. In fact, most of these repairs can be done by homeowners without the need for a professional contractor, saving you both money and the stress associated with hiring one for this type of job.
The first thing to do when repairing a stained panel is to remove any dirt, debris, or mildew from the area. To do this, a soapy water mixture with a microfiber cloth is usually the best method. Vinegar is another option, but it’s important to use a diluted solution, as too much vinegar can cause the vinyl to become damaged.
Once the area is clean, it’s important to use caulk that matches the existing color of your vinyl siding. Using a color-matched caulk will allow the repair to blend in rather than stand out like an eye sore. Silicone-based caulks are generally not recommended for this type of application, as they can degrade or become discolored over time. It’s also a good idea to test out the caulk on a small portion of the siding before applying it to a larger section to ensure that it will work well.
Finally, it’s a good idea to use tape to secure the patch while it is drying. This will prevent the patch from falling off during this process, allowing it to dry and harden properly. Once the patch has dried for at least 24 hours, it should be removed, and any excess caulk can be scraped off with a razor blade. If needed, a fresh coat of caulk can then be applied to the damaged area.
Using this simple method for repairing damaged vinyl siding panels will save you a lot of money and stress in the long term. It’s also a great way to keep your home looking great while protecting it from further damage and preserving its value. If you’re not comfortable handling these kinds of repairs yourself, it’s always a good idea to contact a professional for help. They will have the tools and experience necessary to get the job done right, quickly, and affordably.
 Drain Clearing Services are a great way to get clogged drains cleared again. However, drain-clearing services are not a permanent solution and may leave behind the remnants of past clogs in the pipes. These residues can stick to the pipes, making them harder to clear again. For this reason, you should call a professional Plumbing company to get your drains cleared.