Roofing Installation Is Dangerous

Roofing

If you’re thinking about making some major home improvements, like roofing installation, it can be easy to find yourself overwhelmed. Luckily, there are experts who can help. Contact Colorado Springs Roofing for professional assistance.Roofing

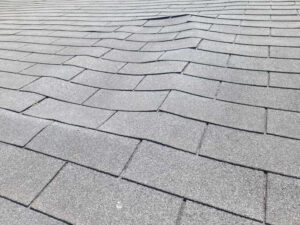
A top-tier roofer will start by removing your old shingles and installing new underlayment and flashing. It’s a loud process, and you should relocate any cars or garbage cans near the house so they don’t get hit by flying debris.

One of the most dangerous parts of any roofing job is climbing ladders and scaffolding to work at higher elevations. Even a slight mishap can lead to fatal falls. Falling from a roof is the number one cause of death for workers in the construction industry. These deaths are entirely preventable with proper safety equipment and practices.

During the re-roofing process, all workers should wear hard hats and use a harness when working on a ladder or scaffolding. They should also make sure that they are wearing comfortable shoes with rubber soles to improve traction. They should always stay aware of their surroundings and keep both hands on the ladder rungs at all times to avoid falling.

It’s important for the roofing contractor to identify any potential hazards before starting a project. This includes identifying access points and any materials that might require additional protection on the roof. It’s also important to talk with the homeowner before the project begins to ensure they are satisfied with the work and that they understand their warranty expectations. Some roofing contractors also offer a checklist to help their clients with these tasks.

Another major hazard is power lines. During roofing installation, workers should never place a ladder near power lines or touch a live wire with their feet. They should also check that any existing debris has been cleared from the area. Lastly, they should always disconnect the nail gun from the air pressure system when not in use.

Lastly, it’s essential to install roof vents during the re-roofing process. These vents will allow the attic space to breathe, preventing moisture from collecting that can lead to mold and rot. They will also help to exhaust hot air and ice dams during the winter months.

Whether it’s online or word of mouth, a roofing contractor’s reputation is everything. Satisfied clients will be more likely to post positive reviews and recommendations, while dissatisfied customers are more likely to spread negative comments that can damage a business’s reputation and potentially lead to future business losses. Taking the time to address any concerns with a client can help a roofer minimize their risk of business loss.

Preparation

A new roof is more than just a way to update the look of your home; it protects you and your family from rain, snow, hail, and other elements that can cause damage and increase utility bills. It is also one of the best ways to add value to your property if you are thinking about selling it in the future.

During the roofing process, you may experience vibrations and hammering that can affect walls in your home, especially those on the upper floors. Taking down mirrors, pictures, framed photos, and other hanging items is a good idea to avoid any damage. Similarly, you should remove anything on shelves that could fall or break during the installation process.

You should also clear out the attic if you store any valuables or heirlooms there. Even the most conscientious roofers can kick up dust during a roofing job, and you don’t want your precious items exposed to that.

Outside your home, make sure to clear the yard and patio area of all children’s toys, bikes, grills, and other movable objects. Keeping these away from the work area helps keep everyone safe, and it keeps the contractors from getting tripped over them or knocking them over. You should also take the time to organize and put away outdoor furniture and other items that might be in the way while the roofers are working.

You will also need to provide a power outlet for the contractors to use while they are working on your roof. An exterior outlet is ideal, but if you don’t have one, you can provide an outlet in the garage. It is best to place it in a spot that doesn’t get much traffic, since extension cords can be a tripping hazard. Make sure you have a contact name and phone number for the contractors in case they need to reach you.

Removal

Re-roofing costs depend on a variety of factors, including materials, labor, and location. The number of stories and slope of your roof also affect the cost. To minimize the impact on your budget, talk to local building contractors about obtaining a permit and scheduling your work during clear weather.

When you start tearing off the existing shingles, be sure to lay down tarps to protect your yard and landscaping from the thousands of nails that will rain down from the old roof. You will also want to invest in a dumpster to reduce waste.

Begin by removing a 2- to 3-foot section of the roofing and throwing it into the dumpster. As you remove a section, work toward the roof jacks. When you reach the jacks, have someone there to gather and toss the discarded shingles into the dumpster. Then move on to the next section. Be sure to carefully pull up and discard shingle debris, as well as the old self-stick ice-and-water underlayment. Once the shingles are removed, begin working on removing the flashing. Start at the top of a valley and work your way down, prying loose flashing as you go. Don’t forget to remove flashing around air vents and pipe flashings.

Installation

Roofing installation is a labor-intensive project that requires bending, climbing, carrying, and sweating. It can also be dangerous, especially for those who have no head for heights and are not in good physical condition. It’s best for homeowners to hire professional roofers for a job like this, as it takes an immense amount of knowledge to do it correctly.

Before installing new shingles, the contractor will replace any old flashing, which is material around chimneys and where different roofing planes meet. This is a vital step that can prevent leaks. In addition, a layer of shingle underlayment will be placed over the existing shingles to provide added protection. The roofer will then install the ridge vent along the roof’s peak. This can aid in the circulation of attic air and be crucial for preventing ice dams during the winter.

Once the underlayment is in place, the roofer will run a row of shingles up the ridge, then cut and nail the shingles to the underlayment. The shingles will be nailed in a pattern that includes close nails near the edge and more spaced-out nails towards the middle. This will be repeated until the ridge is covered. The last shingle will be installed over the drip edge, which is fastened to the underlayment with cap nails that are close together at the edges and spread out more towards the middle.

Mold Testing – A Valuable Tool for Assessing the Condition of Your Home Or Business

Home Inspection

Mold Testing Colorado Springs can help determine whether a home has a mold problem. It is important to understand that even though testing can identify the type of mold, it cannot tell how much or how little of a problem there is.

Home Inspection
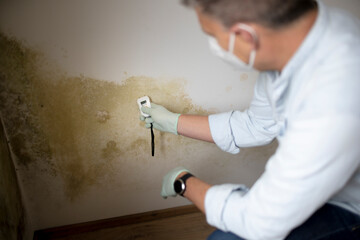
Mold tests can be performed on air, swabs, and bulk samples.
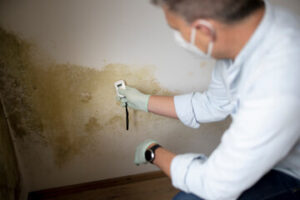
Air Sampling

Mold testing is a valuable tool for assessing the overall condition of your home or business. It can reveal the presence of contaminants and provide clues about how they may have gotten there. However, it is not a substitute for a visual inspection and results should always be interpreted with caution.

Many testing methods require the submission of samples for laboratory analysis. These can include tape strips, swabs or Petri dishes. Most tests that require lab reporting will also involve a wait time for the results as well as fees for the samples submitted. It is important to select a test kit that includes enough supplies for collecting samples from all areas of your building.

Air sampling involves collecting small amounts of air from a variety of locations in the building for subsequent laboratory analysis of spores and other particles. It is a useful tool for evaluating indoor environmental conditions and identifying the distribution of water and other contaminants, but it is only a snapshot in time and a very generalized estimate. Spore counts can vary dramatically over short intervals of time and between different sampling locations in the same building. This is due to a multitude of factors such as mechanical disturbance, occupancy and use, ventilation and other building conditions.

In addition, an air sample only reflects what is in the immediate vicinity of the sampling location. It does not tell you about the distribution of other materials such as dust or the type of contaminant (spores, allergens, mycotoxins, etc.).

One of the most serious mistakes people make when interpreting a mold testing result is to conclude that a problem does not exist because the test did not find any contamination. This is often used as an argument to justify dismissing a mold problem or to defend inadequate efforts at investigating and remediating it.

It is important to understand that a normal complex mixture of mold particles normally exists in all occupied buildings. These particles are brought into the building by people, animals and the air. In some cases, these particles can become concentrated in the building’s contents, surface growth and in the airborne respirable dust. These contaminants can be allergenic and can produce mycotoxins, which are neurotoxins/poisons that can be inhaled.

Surface Sampling

Mold testing techniques can be effective in identifying the types of mold spores that are found on various surfaces. A sterile swab is used to collect the mold spores, which are then sent off for laboratory analysis. This is an effective way to test for specific molds, as well as to determine if they produce the mycotoxins (substances that can harm living tissue) that are produced by some of them.

However, the results from surface sampling should be interpreted with great caution, because of the enormous variability in building conditions that can influence both the spore counts and the types of spores captured on different samples. It is important to remember that a sample taken at one point in time and at one location may not accurately represent other points or times.

Additionally, it is generally not possible to get samples from dead air spaces such as behind walls, above ceilings or under floors. This is often why air testing is more commonly used in these situations.

In general, the best method to gather a physical sample is by using tape sampling. This is typically done by peeling the protective liner from a microscope slide, exposing its adhesive surface and pressing it to a suspected surface. This technique allows for a non-destructive and relatively quick method of collecting samples from wood, paper, varnished wood and other materials that are not easily accessed. In addition, it is an effective tool for assessing the quality of existing paint and other coatings that can support or hinder fungal growth.

The resulting data can help to confirm or eliminate the presence of an apparent mold problem, and it is also useful in evaluating the effectiveness of remediation efforts. Quantitative results, however, should be interpreted with extreme caution because of the enormous variation in the ability of labs to count and identify different types of molds. Additionally, it is difficult to establish valid quantitative standards, as even a very low number of spores can indicate an issue depending on other factors.

In general, a skilled investigator should avoid using testing to “justify” any costs associated with a mold problem and will only recommend it when it is in fact necessary. It is never a substitute for a thorough visual inspection. It is very common, but dangerous, for people to misinterpret equivocal or negative results and assume that there is no mold problem when that may not be the case.

DIY Sampling

Mold testing methods are designed to find the presence of mold spores in air, in dust or growing on building materials and furnishings. They are not, however, very effective in distinguishing between a normal level of indoor molds and a level that is creating a problem. Even a well-performed test only provides a snap shot estimate at a single point in time and a particular location. It is impossible to know how the results compare to other locations and times.

Many people attempt to perform DIY sampling of the mold in their homes or workplaces using various at-home kits. These kits often include tape lifts and swab samples that are submitted to the lab for analysis. These kits can be quite expensive and it is easy to contaminate the samples. They also do not provide any information about what type of mold is present.

The best sample for identification of a suspect mold is to take a bulk sample of the suspected material. This allows the laboratory to identify the genus of the organism. However, this is not always practical – for example, cutting up flooring or walls to obtain a bulk sample may damage them. A tape lift is another option, although it is not as accurate. These samples involve a piece of standard, clear tape with an adhesive area that is pressed against the surface to collect a small piece of mold growth for testing. The advantage of this method is that it does not require the cutting up of expensive furnishings or other valuable materials.

Air sampling is the most commonly used test for determining the presence of mold in buildings. An air pump is used to capture a volume of the air and then tested against outdoor control samples. Unfortunately, these tests do not tell you anything about what types of molds are present or how much of the fungus is actually alive and growing. They also do not tell you the species of the mold, but instead provide a general identifier such as “Pen/Asp.” Species-level testing is available for an additional fee from some labs and can help narrow down the identification to the exact organism.

Laboratory Sampling

Many mold testing kits require lab reporting, which means the samples are sent away to a laboratory for expert analysis. This may take a week or more for results and costs extra money for lab fees. Some types of laboratory tests can identify the genus level of mold present in the sample, while others can provide detailed identification by growing and observing samples under a microscope.

Most laboratory samples are collected using a tape strip, swab, or petri dish. The mold grows in the petri dish under controlled conditions to allow for microscopic identification of specific spores and their relative concentration. The process is labor intensive and time consuming, but it also provides the most accurate and complete result available.

Other laboratory tests can identify a portion of the molds in a sample by counting spores or colony-forming units (CFU’s) and/or using other methods that compare the live counts with those from a non-contaminated control sample taken under similar test conditions. However, this only gives a snapshot of what is actually in the sampled environment, missing those that weren’t alive at the time and place of sampling or that won’t grow well on the nutrients used in the culture.

Air and surface samples can also be tested for the presence of mycotoxins, or poisonous secondary metabolites that certain molds produce and can then be ingested by humans, causing potentially serious health effects. Most experts agree that there are no fixed or enforceable standards for acceptable levels of mycotoxins in the air or on surfaces, but many believe that any levels above zero indicate a problem and should be corrected.

CFU’s/spore counts and mycotoxin testing should be done by a competent professional with training in chemistry, microbiology, building science, aerobiology, and indoor air movement, and knowledge of the types and causes of leaks and water intrusion into buildings. Be wary of “mold testers” who don’t also offer interpretation of lab findings, or only provide a basic level report. A CIH or P.E. is a real credential for industrial health investigations, but it takes more than a certification to understand building failures and leak tracing, how to use lab equipment, and the intricacies of testing and interpreting laboratory results.